
Tourniquets are vital tools in emergency medical situations, particularly when dealing with severe bleeding. Understanding their use and the best practices can make a life-saving difference. This article delves into the importance of tourniquets, focusing on the North American Rescue CAT7, and offers guidance on their proper application and readiness.
Why the emphasis on tourniquets (TQs)? Because severe bleeding is still the number one cause of preventable death in trauma cases and having TQs on-hand and knowing how to properly use them can turn things around in those cases where there is severe bleeding.
Tourniquets: An Overview
A tourniquet is a device used to apply pressure to a limb or extremity to restrict blood flow. It is primarily used in emergency situations to control severe bleeding that cannot be managed by other means. While tourniquets can be lifesaving, they should be used as a last resort. Compression and wound packing are often more effective and less risky options for controlling bleeding. And not just anything can be successfully used as a tourniquet, i.e. belts or rope, etc.
When to Use a Tourniquet
Tourniquets should be considered only after other methods of bleeding control, such as direct pressure and wound packing, have been attempted and proven insufficient. Severe arterial bleeding, where blood is spurting from the wound and cannot be stopped by compression alone, is a clear indicator for tourniquet use. Additionally, in cases where a limb is severely damaged and immediate medical intervention is not possible, a tourniquet may be necessary to prevent life-threatening blood loss.
Time is of the Essence
In situations requiring a tourniquet, time is critical. The sooner a tourniquet is applied to control severe bleeding, the better the chances of survival. Once a tourniquet is in place, it is crucial to note the time of application. This information is essential for medical professionals who will need to assess the duration of blood flow restriction to the affected limb.
Proper Placement: “High and Tight” vs. 3 Inches Above the Wound
A common phrase associated with tourniquet application is “high and tight,” which suggests placing the tourniquet as high up on the limb as possible. However, more precise placement, approximately three inches above the wound, or about a hand’s width, is the best application. This method ensures that the tourniquet still gets applied right without unnecessarily restricting blood flow to larger areas of the limb.
North American Rescue Combat Application Tourniquet: Still The Best Option
When it comes to choosing a tourniquet, the North American Rescue (NAR) Combat Application Tourniquet (CAT, now up to Gen7) is widely regarded as the best option that has also been approved for use. The CAT7 is known for its reliability, ease of use, and effectiveness in controlling severe bleeding. It features a robust windlass system, durable overall construction, and is designed for quick application, even in high-stress situations.
As you might imagine, there are other types of TQs on the market today. In addition to the NAR CAT, you will likely see the RAT, the SOF-T, a ratcheting medical type, a SWAT-T, as well as Snakestaff Systems’ offerings and several others. While each of these have their pitches and their merits, the NAR CAT still gets all the love and references from just about everyone in or near the medical community. Why? All indications point to the fact that the CATs have been proven time and time again.
One bit of advice I will give is not to go looking to purchase cheap, Chinese knock-offs for a fraction of the price. They can and will break. A 5-pack for $12, or whatever they are selling for today, is not a deal. I have seen them easily get snapped in training. Going cheap in this case is not worth the gamble. Expect to spend around $30-32 per NAR CAT TQ.
Tourniquet Colors and Their Significance
Tourniquets come in various colors, each serving a specific purpose:
- Black: Used by military personnel (and law enforcement), and seemingly the most common color for tourniquets in general, black tourniquets are designed for tactical situations where discretion is crucial. You do not really want to be seen on the battlefield.
- Orange: High-visibility orange tourniquets are commonly used in civilian settings and emergency medical services. The bright color makes them stand out and easy to locate in chaotic environments.
- Blue: Training tourniquets are typically blue, distinguishing them from those used in actual medical emergencies. This helps prevent the accidental use of training equipment in real-life situations. Because they get used in training, they will often get re-used for those training purposes, which wears them out in time. You really do not want a used TQ in a real emergency situation.
Application Techniques and Considerations
- Preparation: Before applying a tourniquet, ensure that the affected limb is positioned appropriately, out, flat is ideal. Remove any clothing or obstructions that may hinder the tourniquet’s effectiveness.
On a sidebar note, this is one reason to have shears in your trauma kit as well. You will likely be removing clothing to find the bleeding in the first place; but certainly wanting to get rid of anything else that may be covering up or blocking a solid placement of a tourniquet. - Placement: Place the tourniquet approximately three inches above the wound or roughly a hand’s width. Why? Veins and arteries are elastic and can withdraw or pull away from an injury site, like an amputation for example.
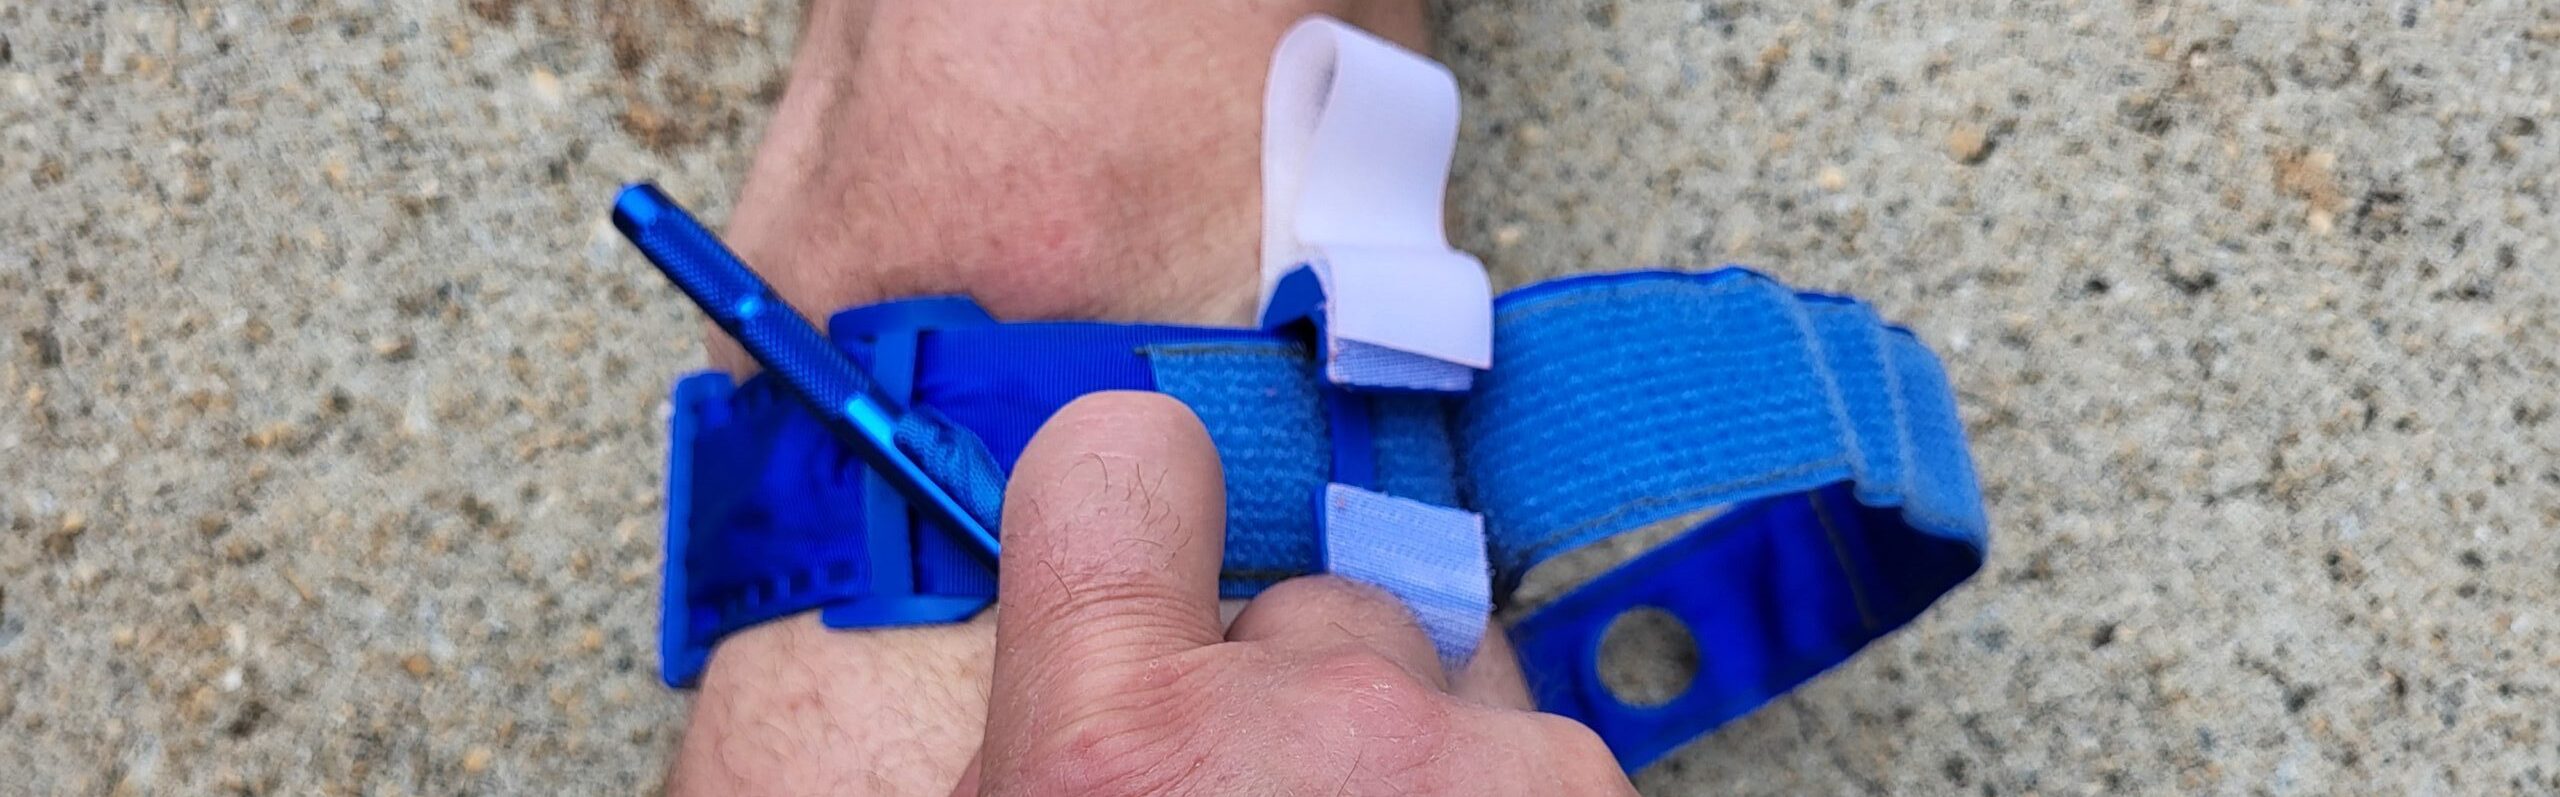
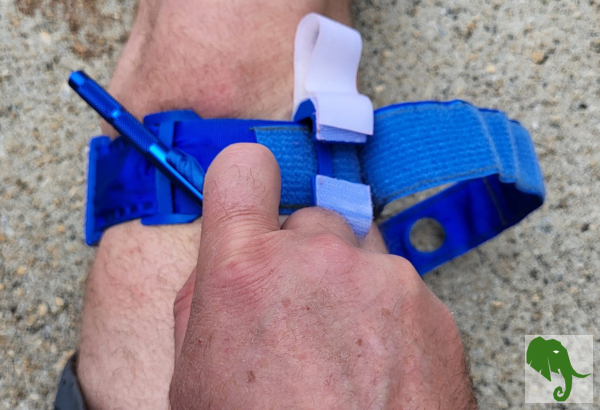
As we just mentioned, also be sure it is positioned directly on the skin and not over any bulky clothing. Additionally, ensure not to put it on top of or over any joint, as it will significantly reduce the TQ’s effectiveness. - Tightening: Tighten the tourniquet until the bleeding stops. First, pull tight the strap and lock it down into place with the hook and loop closure it has. Then, start to turn the windlass rod until it is very tight and the blood flow has stopped. Two tourniquets may be needed. You should then secure the windless rod in its place and pull the hook and loop tab over the opening to secure it.
If your ‘patient’ is conscious, let them know it is normal for the application to cause significant discomfort or pain. You may even want to be prepared for your ‘patient’ to fight with you, adding to your stress level. - Securing: Ensure the tourniquet is securely fastened with the windlass rod locked in its place. Double-check that the bleeding has stopped. If it hasn’t, the tourniquet may need to be tightened further or a second tourniquet applied above the first. Unless you are trained, do not undo a tourniquet once you have it on and bleeding has been stopped. Let the hospital take it from here.
- Monitoring: Continuously monitor the injured person for signs of shock or other complications. Keep track of the time the tourniquet was applied and relay this information to medical professionals upon their arrival. Ideally, write the time on the little tab holding the windlass rod in place, so you do not forget. Time is critical for the application of a tourniquet.
Proper Storage and Readiness
Before you put a new tourniquet in your trauma kit, take it out of its packaging. That is one less thing you want to have to struggle with when you actually need to use it.
To properly carry a CAT, SOF-T, or similar tourniquet, where hook and loop material is used to secure the windlass rod in the windlass clip, it is important to prepare it for quick access. Peel back the windlass strip to ensure the rod can be accessed quickly in an emergency. The hook and loop material used to secure the windlass rod can be tricky to remove under pressure, as your fine motor skills may be hampered when under that much stress, so having it ready for use can save precious seconds.
If you have more than one TQ, which you should, consider leaving one in its loops but have another pulled free from its loop and simply folded up. You never know which may be easier to get on to someone based on their positioning; and you do not want to fight with your TQ either when you have to put one on yourself. Make it easier for yourself and have them ready to go BEFORE you need them.
Additionally, TQs have about a 5 year shelf life. They do ‘expire.’ I will not say they go bad after five years per se; but things, like elastic and plastic, can and do break down over time, especially if left out in the heat. Try to schedule a regular interval to check out all of your equipment and replace as needed.
How Many Tourniquets to Carry
You should carry a minimum of two tourniquets per person you plan on needing to treat. This redundancy ensures that if one tourniquet fails or if multiple limbs are injured, you have a backup readily available. Plus, you may need to apply two to the same limb. Carrying multiple tourniquets also allows you to assist others in need during a mass casualty event.
The Role of Training and Practice
Proper tourniquet application requires training and practice. Individuals who may find themselves in situations where tourniquets are necessary should seek training from certified organizations. Hands-on practice with training tourniquets (typically blue) can build confidence and competence, ensuring that the device can be applied correctly and swiftly in an emergency.
Training tourniquets stand out for a reason: their blue color immediately identifies them as training devices. As we already mentioned, over time, these tourniquets can become stretched out and less effective, making it crucial to distinguish them from operational tourniquets, which should be black or orange and unused. While a training tourniquet can be used in an emergency if necessary, having a properly stored and unused operational tourniquet is preferable.
A Personal Story on Training
I have been working to teach my parents some basic trauma care, emphasizing the importance of knowing how to use a tourniquet. My parents, despite their age, are eager to learn because you never know when this knowledge might be needed. My dad still mows the lawn on a very large zero-turn lawnmower on some hilly property; and both of my parents still drive, so the possibility of encountering a situation requiring a tourniquet is still there, even if it is low.
Carrying Tourniquets: Practical Advice
Get a tourniquet(s). Carry it. Here’s a simple plan:
- Get one or more tourniquets. Start with at least one per person, ideally two per.
- Learn how to use them. Training is crucial.
- Carry them with you. Keep one on your person, one in your vehicle, and keep a few in the house too. Won’t do you a bit of good if you do not have them with you.
Following just these few simple steps, ensures you’re prepared whether you’re at home, on the road, or out in public. Accidents can happen anywhere — at home, on vacation, at the gun range, or in an active shooter situation. Knowing how to apply a tourniquet can be the difference between life and death.
Conclusion
While we cannot cover everything in one article or cover some details reserved for more advanced training, our hope is that we have provided you with a good enough overview here to inspire you to get some tourniquets to have on hand and to seek the appropriate level of training for your needs.
Tourniquets are indispensable tools for controlling severe bleeding in emergency situations. However, they should still be used as a last resort after other methods, such as direct compression and wound packing, have been exhausted. The North American Rescue CAT is widely recognized as the best tourniquet option due to its reliability and ease of use.
Understanding the significance of tourniquet colors, the importance of proper placement, and the critical nature of time can enhance their effectiveness.
By prioritizing training and practice, individuals can ensure they are prepared to use tourniquets correctly, maximizing their potential to save lives. While no method is foolproof, combining these practices with vigilance and proper technique can significantly improve outcomes in critical situations.
Related Content
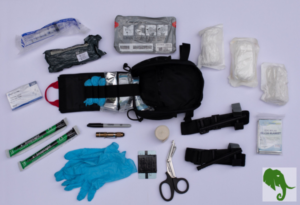
Building a Comprehensive Trauma Kit for Emergencies
In times of crisis or accidents, being equipped with the right tools can make the difference between life and death. Whether you’re out in the …
Overview Season 1: Episode 3 In this episode, we discuss the Stop the Bleed program with Gina Solomon, Trauma Program Manager at Gwinnett Medical Center in Lawrenceville,…

Read other OwnGuard Solutions blog posts
Read our other posts centered around being safer and better prepared.